25 East Willow
Millburn, NJ 07041
(973)379-5055
24/7 Patient Access
Mon - Fri
Call for Appointments
Millburn, NJ 07041
24/7 Patient Access
Call for Appointments
Most backaches can be treated simply and effectively. That’s because common problems involve soft tissues (muscles, ligaments), which may be weak, tight, irritated, or damaged. The program in this booklet is designed to help heal these tissues and to protect them from further problems.This program also helps greatly when there is an underlying problem with other structures. The discs (pads) between
vertebrae deteriorate. They may bulge and sometimes rupture (herniate). The facet joints, which connect the back parts of the vertebrae, become irritated. These and other changes can cause pain. This program stimulates circulation, improves alignment, strengthens the surrounding muscles, and reduces stress to these areas.
The crucial part of the lower back is the area of the five lumbar vertebrae. Here all forward and backward bending of the back occurs. The lumbar spine curves forward, and the vertebrae must be supported the way a leaning tree is supported by stakes and wires. Back muscles provide this support. And because the vertebrae are stacked on the pelvis, pelvic position also affects low back position. Muscles of the hips and abdomen control pelvic position. If the upper part of the pelvis moves forward and downward from its normal position, the forward curve (lordosis) in the lumbar area increases. The spine moves forward toward the abdomen and the result may be swayback, too much lumbar lordosis. The abdominal muscles attach to the upper part of the pelvis. Weakness of these muscles is a major cause of swayback. The gluteal muscles in the buttocks attach to the back of the lower pelvis, so weakness of these muscles also causes forward rotation. With swayback, the muscles, ligaments, and other tissues of the back may become short and tight.
Posture is the position of your body both at rest and during activities. Swayback is a form of poor posture. In good posture, the pelvis is tilted back to its normal position. This booklet shows habits and simple exercises to make good posture of the pelvis and low back your natural position. Returning the low back to its normal slight curve may reduce pain and, if maintained, make future attacks of back pain less likely..
The disc is like a cushion between the vertebrae. It has a soft gelatin-like center and a thick, tough outer wall. The discs are firmly attached, top and bottom, and cannot “slip.” They begin to dry out at an early age and gradually lose height and resilience. This drying of the disc is the most basic underlying problem. One of the benefits of exercise and other recommendations in this booklet is likely to be healthier discs.
The disc wall may bulge and even tear. The soft material from the nucleus may pass through the damaged wall. The bulge or soft material may press on a nerve root, causing sharp leg pain-sciatica. This happens in only a few percent of cases. Your doctor will probably be able to tell if you have this condition. It
will usually heal if you allow it time, aided by this program.
Facet joints can become irritated. Reduced height in the disc can put greater forces on these joints, causing wear. Wear in a joint is called osteoarthritis. Exercise and good posture in all your activities help protect against pain starting in the facet joints.
Nerve roots leaving the spinal canal travel through a narrow passageway between two vertebrae. As a person ages, this area tends to get smaller because of the loss of disc height and the growth of bone spurs (osteophytes). The narrowing, called spinal stenosis, may irritate nerve roots. Typically this kind of nerve irritation causes dull pain and/or numbness in the-legs. Although walking often brings on the pain, certain exercises are helpful.
How to speed recovery from a painful back attack
This three day competition combines extreme sports and a celebration of everything that is wintery, fun and exciting.
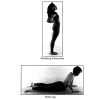
Bed rest, at once or as soon as practical, can be very helpful. Get up as little as possible, but limit this kind of rest to two or three days. In some cases, as with leg pain, your doctor may order more, but prolonged bed rest weakens the body and has other ill effects. Find the resting position most comfortable for you. Usually this is on your back with knees up and supported by a blanket roll or heavy pillows. Another position is on your side with knees bent and a pillow between them.
Ice packs are usually better in the first forty-eight hours. To avoid frostbite, limit ice to 15 or 20 minutes every hour and use a towel over the pack. Some people like an “ice massage,” ice cubes moved about directly on the skin. After the second day use heat. Some people like “moist heat” heating pads (be careful not to burn yourself). A hot water bottle or microwave gel pack is preferred by those who want to avoid the electromagnetic radiation from a heating pad., Avoid continuous heat or ice.
If you get your back into a relaxed position and stay there for awhile, you may get quick relief. The “Z” position often helps.
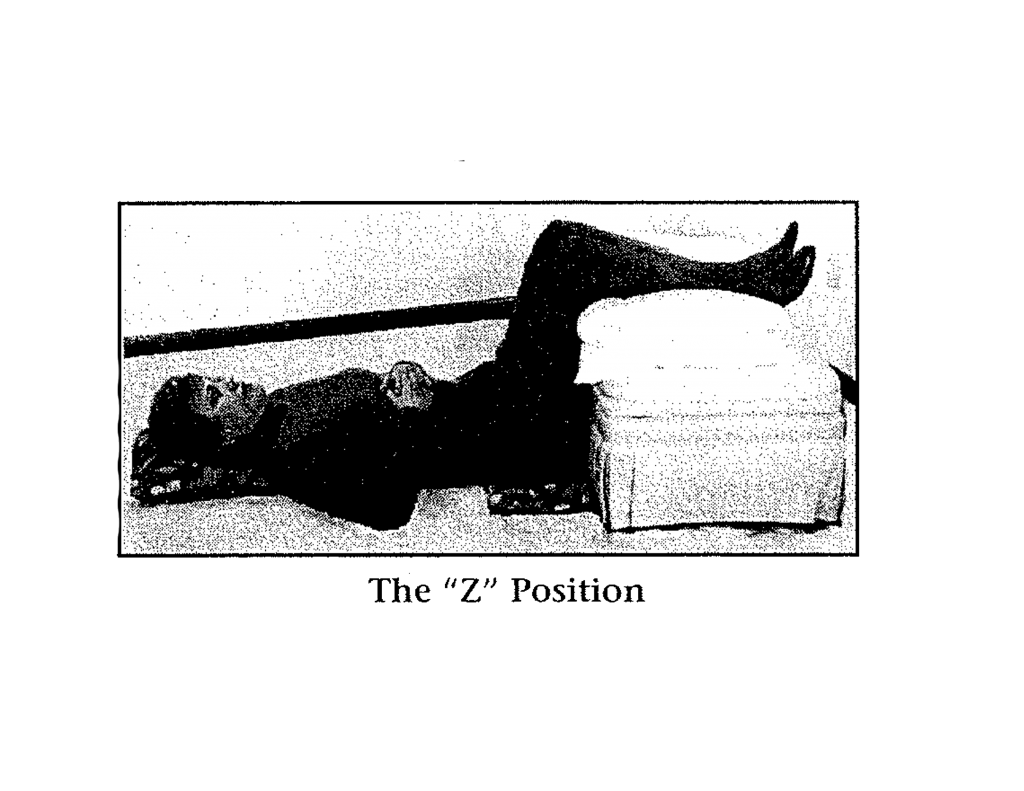
Lie on floor with your lower legs and feet on a low table, hassock, or low chair. Use a pillow or pad for height or comfort. Thighs should be nearly vertical. Put a thin,cushion or towel under buttocks (not under back). Put a small pillow under your head.
It takes trial and error to find the positions that relieve pain. Stop m1)1 that make your back hurt more. The clues in the boxes will help.
If back pain is worse when you sit or bend forward, these positions are likely to help. They move you "away from pain."
While standing with feet apart and hands on buttocks, push hips forward and gently bend backward while looking up. Hold several seconds. Keep knees straight. Relax, repeat. Do several times a day, especially after sitting.
First try lying on your stomach without any raising. If this hurts, put a small pillow under the top of your pelvis. As pain lessens, remove pillow.
Rest on forearms like a child watching TV. Try 3 to 5 minutes. A pillow may be used instead of forearms.
Advance to this when you can. Lie on your stomach. Place your hands palms down on the floor near your shoulders. Slowly push your upper body up. Let your hips sag. Keep chin in. Stop raising when you feel tension. Elbows need not be straight at first, but later you will probably be able to lock them. Hold for several seconds (breathe naturally), then return to floor. Relax and repeat. Start with 3 repetitions. Work up to 10.
extension positions (above) are likely to help. So might the "Z" position.
If back pain is worse when you bend backward, these positions are likely to help. They move you “away from the pain.”
Stand with back against a wall with feet about 12 inches from the wall. Squeeze your buttocks together as if gripping a coin. Pull in your abdomen. The space behind
your back should be gone. Hold several seconds. Relax and repeat a few times. With practice, you will be able to bring your feet closer to the wall and still have a flat back. Do this several times a day. A wall is helpful at first but not necessary later.
Lie on back on floor, knees bent. Squeeze buttocks, pull in abdomen. Low back goes flat. Hold several seconds. Relax, repeat. Work up to 10 times.
Same as Lying Pelvic Tilt, except also raise buttocks slightly-an inch or so. Do not push with feet.
Sit in a chair, flatten back (do pelvic tilt), knees apart. Bend slowly at waist, hands reaching toward ankles, head ending near knees. Hold briefly, sit up, relax and repeat. Do not force for extra distance as this will cause pressure inside discs.
Lie on back on floor, knees bent. Do the pelvic tilt. Hold low back on floor as you begin. With hand over knee (or under), gently pull one knee toward chest. Hold it while pulling other knee toward chest. Hold both for 10 seconds. Return one knee at a time, relax, and repeat. Do not straighten
knee when returning. Work up to 10 repetitions.
Leg pain that is dull and worse if walking suggests stenosis. last paragraph. Try above flexion positions.
How to protect your back at all times
Standing. Stand tall. Slouching shoulders forward is bad for the back. Practice keeping your shoulders slightly back and
your chin a little tucked in.
Pelvic tilt while standing. When you must stand for a long period, occasionally tilt your pelvis.
Foot up. One foot on a stool or rail
improves back posture-helpful for bank tellers, surgeons, and others who stand a lot. Also useful for home tasks-washing dishes, ironing.
Changing position. Don’t stay in one position very long. Relax shoulders, then dangle arms occasionally.
Leaning. Whenever possible, avoid
leaning from the waist. When you must reach down, bend your knees and use the lifting principles . Two of the exercises in the conditioning group strengthen muscles for this purpose.
High heels. Low-heeled shoes are usually recommended because many people get relief from switching to lower heels.
But there are exceptions-some people do better with higher heels. Men can try higher heeled boots.
A mattress must support your body in two ways. It must be fi-rm enough to keep your spine horizontal. Your body must not sag as if in a hammock. It must follow your curves. This is called good conformity. Test for conformity by lying on your side-the mattress should come up strongly into the waist area. To meet the first requirement, modern mattresses have firm springs, and some have extra support in the middle area. To meet the second, a large number of smaller springs is helpful.
Your weight and your shape affect your choice of mattress. A heavy person needs heavy springs-more firmness. Others need
less firmness so that hips will sink in a little. If your hips are much wider than your waist; you will need lots of conformity so that waist and lumbar spine are supported. Be sure to try out mattresses in the showroom before you buy. Take your time.
A modern foundation gives a strong, flat support to the mattress. When the foundation sags and you can’t afford a new one, a bed board should help. Use 3/4 inch plywood between the mattress and the foundation. A piece 4 feet wide by 5 feet long ( easily cut at a lumber yard) is usually large enough for a double or queen size bed. A king size bed (76 inches wide) requires two 3 feet by 5 feet pieces. Bear in mind that a bed board will not fix a poor mattress.
Waterbeds, some people say, are helpful for their backs; others say their backs are worse. Newer models have extra support in the lumbar area. Try one at least overnight before you buy.
Sleeping position. On your side is best. Put arms in front and partially curl your body. A pillow should fit the space between mattress and head. Head should stay in line with body, tilted neither up nor down. Foam pillows tend to hold head too high.
Sleeping on your back is okay if your knees are raised and supported. A blanket roll or large pillows can be used temporarily, but adjustable beds (either rented or purchased) are easier. For your head, use no pillow or a very thin one.
Sleeping on your stomach strains the back. If that is your only comfortable position, try a thin pillow under your pelvis.
Basic rules. If you sit for long periods,
1. take a proper position,
2. use a chair with good support,
3. get up and move about occasionally,
4. exercise regularly.
Proper position.
Sit with low back supported by the back of the chair. Do not lean forward except briefly. Knees should be a little higher than the hips, and thighs should be well supported. Feet should be firmly on floor or (if necessary for a short person) on a low stool or phone book.
The ideal chair firmly supports the lumbar area but not with a narrow band. The back rest should rise at least to the top of the lumbar area and preferably to shoulders. Seat should adjust for height and be deep enough to support the thighs. Tilting action (both seat and back moving together) is good for frequent relief from one position. Arm rests also help.
Driving a car or truck
Sit back. Don’t lean forward. Adjust seat so pedals are reached easily. Knees should be slightly higher than hips. Add a back support if seat back does not firmly support lumbar area (see below). On trips, stop frequently and walk about. Truckers and others who must travel for long periods should try foam seat cushions to reduce road vibration. Arm rests are helpful in decreasing the force on the low back. Back support. A simple back cushion can help greatly in any sitting situation where good back support is lacking.
This chair has strong lumbar support, adjustable backrest, adjustable armrests, and ample thigh support. Both seat and back can be tilted and locked backward to reduce force on the spine.
Try a large folded towel or small blanket to find out what thickness works for you. When you have success, buy an inflatable pillow or commercial back support that can match the thickness you want.
Back support. A simple back cushion can help greatly in any
sitting situation where good back support is lacking.
Use these rules whenever you pick up anything. Use the basic ideas whenever you reach down or lean over, even if not exerting.
1. Face the object. Do not twist your body.
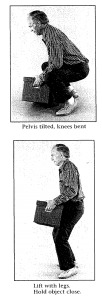
2. Do the pelvic tilt. Tuck in your buttocks and pull in your abdomen. old the tilt while you lift.
3. Bend your knees. Go down a far as possible with your legs, not your back.
4. Hold object close to your body. If the object can’t be held close,don’t lift it. Look straight ahead.
5. Lift with your legs. Use the large thigh muscles, not the small back muscles.
6. Limit the height of your lift. Lift a heavy load no higher than your waist. Lift a light load no higher than your shoulders. Greater height sways the back.
7. Pivot on your feet. When you must turn with an object in hand, turn your whole body. Do not twist to set the object down. Twisting while bending is a major cause of injury. Combine these principles into one habit of lifting. It is not enough, for example, just to bend your knees. And don’t be a hero with heavy items. If possible, get help with luggage. If an item is large or awkward to hold, at least two people should do the lifting
Crane Lift-use this method when you cannot use the squat lift Bend knees slightly. Bend forward at hips, keeping head up and back straight. Slide object to you before taking full weight
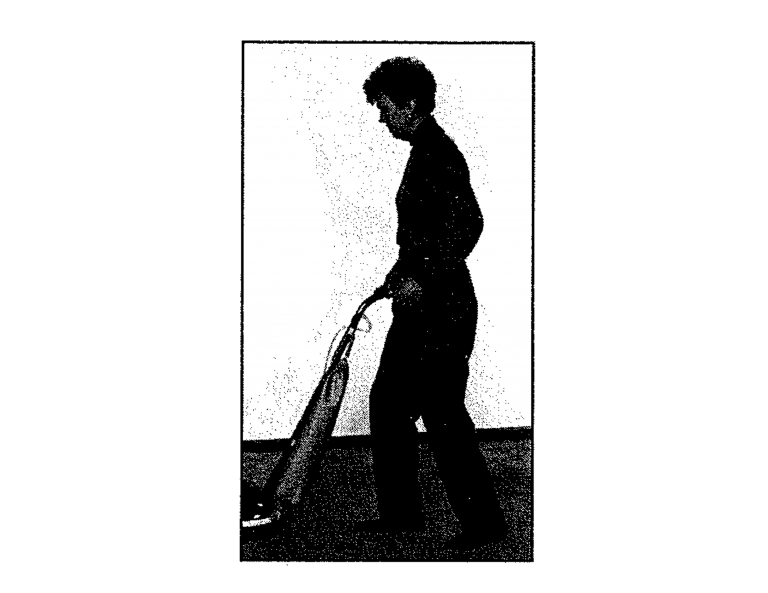
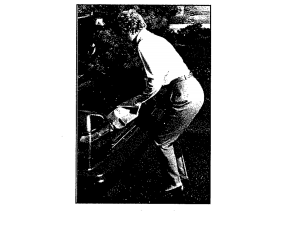
Bend knees when vacuuming, mopping, raking, etc. To avoid bending your back, step forward and backward as you work. If leaning is necessary, bend at your hips. Use self-propelled vacuum if possible.
Obesity. Being overweight puts an extra load on the spine. If your doctor tells you to lose weight, do the sensible things that will get the job done. Adopt a lifetime diet of smaller portions, low in fat, high in fruits and vegetables, with little or no alcohol, and very little refined sugar. Avoid diet fads. A regular exercise program of the type described on the next page is also important. You will burn more calories, even when not exercising. See your doctor before beginning any special diet or exercise program to be sure it is right for you. Remember, the more fat around your waist, the more strain on your back.
Sex. Back pain has a reputation for upsetting sexual relations. Severe pain calls for abstinence, but after pain has subsided, intercourse is usually okay. A suggestion: the person with the bad back should lie underneath and should use a pillow under the buttocks. An alternative is for the woman to lie on her
side with knees bent. The man can lie behind, facing her back. A hot bath or gentle massage can be a helpful prelude.
Overall fitness requires exercise, proper weight, good diet, control of stress, and other healthy habits. Fitness has many rewards including a back less likely to cause pain.
Smoking can affect the back. A British study found that the more cigarettes a person smoked, the more severe and longer lasting were back attacks. Smoking reduces circulation in small blood vessels including those that nourish the spinal discs.
Good nutrition is important. Most people need to reduce fat intake and to increase vegetables, fruits, and whole grains. Supplements may be needed but will not make up for a poor diet. Extra calcium helps reduce age-related bone softening (osteoporosis). Vitamin C may be helpful because it helps build the collagen needed by discs. Some authorities believe 8 glasses of water a day will slow the disc-drying process.
Whole-body exercise is a part of fitness. Aerobic exercise is rhythmic motion done long enough and hard enough to keep your heart rate in the “target range” for at least 15 minutes. Longer periods, along with warm-up, are usually recommended.Exercising five or six days a week is best, but three days a week will probably maintain whatever level of fitness you achieve.
Be careful! Heavy exercise can be dangerous. An exercise program requires your doctor’s approval and should always be increased in gradual stages. It is not necessary to do any exercise at a strenuous level. Some people should not try for the aerobic target but should just move at a comfortable pace.
The following activities are generally good, but heed the warnings that will be given.
Walking has low risk. It can also be done indoors, such as in a shopping mall, or on a motorized treadmill at home or in a gym. Work up to at least a half-hour per session. Some patients report back relief from walking one mile per day. Important: keep posture erect-no forward slumping. Let hips swing freely. Use
well-cushioned shoes or special shock-absorbing insoles. Choose only level areas until your back is strong.
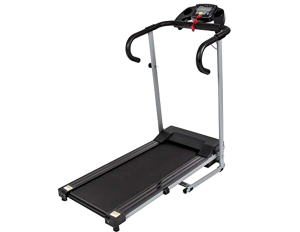
Walking on a motorized treadmill is a good weight-bearing exercise.
Model with shock-absorbing belt is preferred.
Model must allow for adjustment to zero incline.
A motorized treadmill is the equipment people stick with most. Obviously, only what you continue to use will do you any good. A treadmill allows you to walk naturally at whatever pace you select. You can watch television or listen to music. Treadmills are expensive, but good used ones are available.
Caution: Before you buy, be sure speed can be set low enough for your comfortable starting pace. Also look for a model with good shock absorption, especially if you intend to jog. Use zero incline until your back is strong.
Some elderly people cannot get used to the “moving floor” and should consider a stationary bicycle.
Bicycling is best with minimum crouch and fully extended legs. The racing posture may strain the back unless the back is first strengthened and bike adjustments are ideal. Never ride with a swayed back. A stationary exercise bicycle is good for almost anyone (without arthritic knees) who has the will power
to stay with it. Ride with a slightly rounded back.
Cross-country ski machines and stair-steppers may cause stress on the back because riders tend to lean forward.
Jog only with caution. Avoid hard impact. Reduce the shock with well-cushioned shoes and a running surface that gives. Look
for a track with imitation grass or other cushioning material. Even so, jogging may not be right for you.
Swimming takes the load of gravity off the spine while allowing stretching, strengthening, and aerobic routines. If your doctor approves, learn an endurance program and use it on a regular basis. Avoid the butterfly and breast stroke at least until you are pain free. The side stroke is best for starting.
Conditional Activities. The following are hazardous for occasional players with backs out of condition. If you have strengthened your back with the back exercises, and if you play moderately and within your ability, your doctor might permit them. Most of these sports, however, are not effective exercise because exertion is intermittent (as in baseball) or just insufficient (bowling). Begin cautiously. If a certain movement causes back discomfort, either at the time or later, avoid that movement.
Baseball
Softball
Basketball
Table Tennis
Horseback
Riding
Ice Skating
Back
Packing
Golf-get coaching on how to protect the back.
Do not lean backward after the swing.
Bowling-do not jerk backward at release.
Tennis-do not arch back as in hard service.
Skiing-hazardous for beginners. Experienced skiers must first get in shape.
Low-Impact Aerobic Exercise-no jumping.
Weight Lifting-Get help from knowledgeable trainer,. Avoid twisting, heavy weights, and bent-over positions, among others.
Hazardous Activities. Avoid these and any others that have rough contact, twisting, sudden impact, or direct stress on back.
Football
Touch Football
Soccer
Volleyball
Handball
Tobogganing
Sledding
Snowmobiling
Ice Hockey
Trampoline
Certain Calisthenics:
Both legs raised straight
Sit-up if legs straight
Hip twists, toe touches
Thrusting backward
Nonetheless, if something in this hazardous category is important to you, perhaps you do not need to rule it out completely.
After you are over your back pain and are in good shape, ask your doctor about it.
1. Start with physician’s approval. Do not begin the conditioning group if you still have acute (severe) pain.
2. Exercise every day. Benefits come from discipline.
3. Do two sessions a day for two months. By then you should see major improvement and can probably cut back to one session a day.
4. Set aside regular, private times. Usually these are an hour or so after arising and just before retiring. After arising, it’s best to walk a few minutes first so that discs return to normal (they swell when not carrying weight).
5. Select a comfortable, firm surface-a carpeted or padded floor. Wear loose clothing or underclothes.
6. Begin by relaxing. See next page for a suggestion.
7. Always move slowly and smoothly. Do not jerk.
8. Progress gradually at your own pace. Do only three repetitions of each exercise you select in the conditioning group for the first two or three days. Then add one repetition to each exercise you can do with ease and comfort. When the new number can be
done with ease and comfort, add another. Work up to 8 or 10. You can do more, but a short (10 to 15 minute) session is easier to stick with every day than a longer session
Discomfort and soreness: At first, mild discomfort during exercise is common. So is stiffness or soreness between exercise periods. If this lasts beyond the first few days, you are probably exercising too hard or progressing too fast. Slow down. If it lasts more than the first two weeks, talk to your physician.
If you have significant discomfort or lingering pain or sensations from any exercise, stop that exercise for several days. Then try it again with fewer repetitions.
If leg pain is your main complaint be sure to favor walking and swimming. While you still have severe pain, however, avoid any activity or exercise which irritates your back. Hopefully, you will be helped by resting in a position of comfort and by the other pain relief positions and exercises, such as extension stretches and perhaps the pelvic tilt As pain subsides, continue pain-relief positions and move slowly into the conditioning group You will not be able to do the single-leg raise while this condition persists.
Heat helps. You may have found already that heat on your low back (tub bath, shower, heating pad) for 15 to 20 minutes relieves is comfort. Much of the benefit is because heat relaxes muscles. So, even if you have no pain at the time, using heat before exercise will help with relaxation.
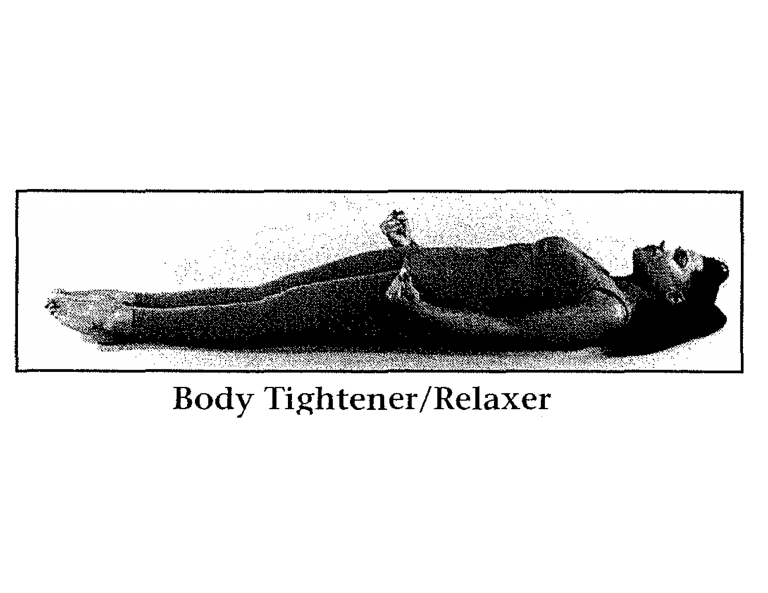
A relaxation exercise helps. The following is one of many possibilities. Do this or a substitute before each exercise session.
1. Lie on your back on covered floor.
2. Tighten your whole body as you take a slow, deep breath.
Clench fists and press legs together.
3. Close your eyes and “let go” of your body as you exhale.
Let arms and legs “drift away,” Let your jaw sag.
Repeat 5 times.
Strengthens low back and abdominal muscles
1. Start on your back, knees bent. Do the pelvic tilt and hold
back flat on floor as yon begin next step.
2. Extend hands toward knees. Slowly raise head and neck,
then shoulders. Use a curl-up motion, keeping chin
toward chest. Hold for a count of 5.
3. Curl down to starting position. Relax and repeat for a total
of 3 times. Gradually increase to 8 or 10 times.
Benefit begins when shoulder blades leave floor, but at first you might not be able to raise them very far. That’s okay. Gradually go higher until back is 45 to 60 degrees from floor. This may take weeks, or you may never get that high. That’s okay too. Also, a full sit-up is necessary and may irritate the low back. ADVANCED SIT-UPS. Some lightweights may find the above easy. They can advance with arms at waist, then with hands at ears. Do not lock hands behind head (creates pull on head)
Strengthens side and diagonal abdominal muscles
1. Start as above. Do pelvic tilt and hold back flat on floor.
2. Curl as above, but reach with both hands to side of knees,
gently turning trunk and shoulders. Hold for 5 count.
3. Curl back, relax, repeat but reach to other side of knees.
Do 3 times to each side. Work up to 8 or 10.
Caution: Never do sit-ups with legs straight! Never jerk for height!
Stretches low back and hamstrings.Stretches hip flexors (when legs extended).
START on back on covered floor, knees bent.
1. Do the pelvic tilt so that your low back is flat on floor.
2. With hand over (or under) one knee, pull knee gently
toward armpit. When you feel tension, stop (gradually
you will go farther). Hold for a slow count of 5.
3. Return to starting position. Relax a few seconds.
4. Repeat with the other knee, starting with back flat. Do
each knee 3 times. Gradually increase to 8 or 10.
After a few weeks, when you can more easily keep the low back
flat on the floor, start with both legs straight. First do the pelvic tilt, then bend one knee, then pull it over chest. Hold for a count of 5. Keep the opposite leg straight and on the floor so as to stretch the hip-flexing muscles attached to that leg. Return the pulled knee to the bent resting position. Slide foot so that both legs are straight on floor again. Repeat with other knee. Increase number of repetitions gradually.
Strengthens hamstrings and quadriceps. Prepares for lifting and other tasks using leg muscles, not back.
Caution: Discontinue· this exercise if it causes significant and persisting discomfort in knees or hips.
Begin after 3 or 4 weeks, when you can do a good pelvic tilt. Have··
someone confirm that you are holding a flat back during the exercise.
START by standing behind a sofa, heavy chair, or next to a counter,
holding it for balance.
1. Do the pelvic tilt and hold it.
2. Squat down ABOUT HALF WAY, only as far as is comfortable.
3. Stand up, using leg power, not hands. Do not bounce.
Relax and repeat twice, increasing gradually to 8 to 10 times.
This alternative to above exercise may be easier than the above if you stop the slide at about 45 degrees.
Begin after 3 or 4 weeks, when you can do a good pelvic tilt. Have··
someone confirm that you are holding a flat back during the exercise.
START by standing behind a sofa, heavy chair, or next to a counter,
holding it for balance.
1. Do the pelvic tilt and hold it.
2. Squat down ABOUT HALF WAY, only as far as is comfortable.
3. Stand up, using leg power, not hands. Do not bounce. Relax and repeat twice, increasing gradually to 8 to 10 times
Stretches low back and hamstrings. Strengthens abdominal and hipfiexing muscles. Stretches hip-fiexing muscles (when both legs extended).
If you have sciatica (dominant leg pain), omit this exercise.
START on your back on covered floor, ONE knee bent.
1. Do the pelvic tilt so that you begin with back flat on floor.
2. Slowly raise straight leg, keeping it straight and keeping
low back on floor. Raise leg until you feel mild tension.
Do not thrust. Greater height comes gradually. Hold for a
slow count of 5.
3. Slowly lower leg, flattening back as leg approaches floor.
4. Relax a few seconds and repeat with other leg. Raise each
leg a total of 3 times, increasing gradually to 8 or 10.
After 4 to 6 weeks, you can probably do the pelvic tilt with legs
straight without discomfort. If so, try starting the above exercise with both legs straight. The low back now tends to rise. Check with your hand to be sure that it does not-both when lifting the leg and lowering it. If you cannot hold your low back against the floor, resume with one knee bent.
Strengthens erector spinae group running length of spine. Improves posture.
Advance after you can do the previous level well 8 to 10 times. DO NOT JERK upward. Do not continue at any level that causes pain.
START: Face down on floor, chin tucked in, arms at sides.
1. Slowly raise head and chest as much as you can. Keep head down, chin tucked in. Hold for slow 5 count. Breath normally.
2. Slowly return to floor.
3. Relax. Repeat twice. Gradually increase to 8 or 10.
Same as Level 1 except hold hands at head, elbows off floor
Same as Level 2 except raise legs (keep straight) and upper body.
Same as Level 3 except raise outstretched arms also.
Offers greatest benefit, but takes more time. Leave arms at sides. Raise upper body and legs (keep straight). Hold the position until you tire. Gradually work toward 4 minutes.